
Heey everyone I hope you're all doing fine, and everything is good....
So today is my very first DIY!! I hope you all enjoy it and if you like it plz let me know :)
First I thought about this idea when I decided that I need a desk in my room (YES, I'm the girl who does everything on her bed, but not anymore!) However, I didn't want to buy a new desk. I wanted to take an old desk, and try it out for a while as a solution. But it was SO ugly, and dull! Which made me think about it again, and I finally decided to redesign it!! YAY!
NOW LETS START
1) The desk of course BEFORE ( I think it's from IKEA). You can see how dull, and lacks life..

2) And now, let's get to the fun part! As an artist, you want everything that belongs to you, or in front of you to be pieces of art. Somethings that inspires you in life or work or even motivates you. And you try to put, and capture these elements in your work, and that's what I did.

For me, as you can probably see in my blog, I LOVE FASHION, and everything about it! So what I did was.... I collected random pictures from magazines and some old photos, I also printed some pictures from the internet. As you can see, you can get it from anywhere you like.

Just think about why this photo moves your feelings, or touches your heart, and pick the right ones, with the right effect. After that, pick the colors that you want to see. Be sure that you choose the best colors for you. Like, if you want more attention choose contrast colors (Blue with orange, purple with yellow). If you want peace of mine, and quiet, choose one color and its shades (red with orange with yellow). In my case, I used black and white to make the pictures speak!
I want you to keep in mind, that every one has their own colors and what works well with each other.
 |
| choose different sizes |
So I gathered my pictures, and what inspires me, and basically randomly spread it on the desk.
 |
after I covered the whole desk AND use your eyes to see what fitting with each other
|
3) Make sure that the desk is totally CLEAN.

4) Now you need, wood glue and a big brush. Mix a litter of water with glue, and color of the pictures. Make sure that you start from the center of the picture, and go out. Make sure that you cover all corners of the picture.

 |
| here you can see how i covered the corner |
 |
| I love this effect (turning into a piece of ART) |
5) After it dries, use (High Gloss Coating). It's my first time to use this product. It includes a bottle, and you should prepare a big bowl, and then you mix it. After that, make sure that the mixture is homogeneous! When you Finish, pour it on the surface of the desk and make sure you don't exceed 30 minute while covering it!! After that, leave it to dry for 24 hours,and I got it from jrer.

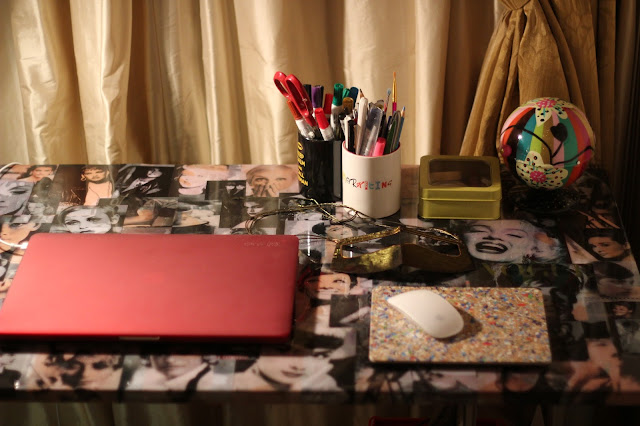
After it dried, clean the desk again. And now you're ready to decorate it and use it! :)
Now you have a unique, one of a kind, and simple desk, only for YOU.

*P.S: It's my first DIY so remember that anyone can do this idea. Plz let me know if you did, by posting it on Instagram COZMOBURQA, and mentioning me, I'll then repost it! Or you can send it on twitter, or email me. It will make me really happy!
THANK YOU ALL HOPE YOU ALL ENJOY and if U have any QUESTION I'm here for YOU :)

0 comments